IMProv - AWS Deployment Tutorial
This tutorial presents the step by step instructions to gather the data files and driver scripts needed to perform a MPI based IMP modeling job run. We demonstrate these steps using the PRC2 example project and explain how this was prepared using MassSpecStudio. The instructions cover running the job on a AWS EC2 spot instance.
PRC2 example project (download):
The data folder contains various artifacts used to inform the integrative modeling. The imp_model folder contains the driver python script and example yaml configuration for running the IMP modeling job.
Fast Track:
Login to your AWS account and from the Management Console perform these steps to launch an EC2 spot instance using the AMI for IMProv MPI jobs
- steps to setup your own AMI, see Deployment section
- steps to launch existing AMI, follow along here.
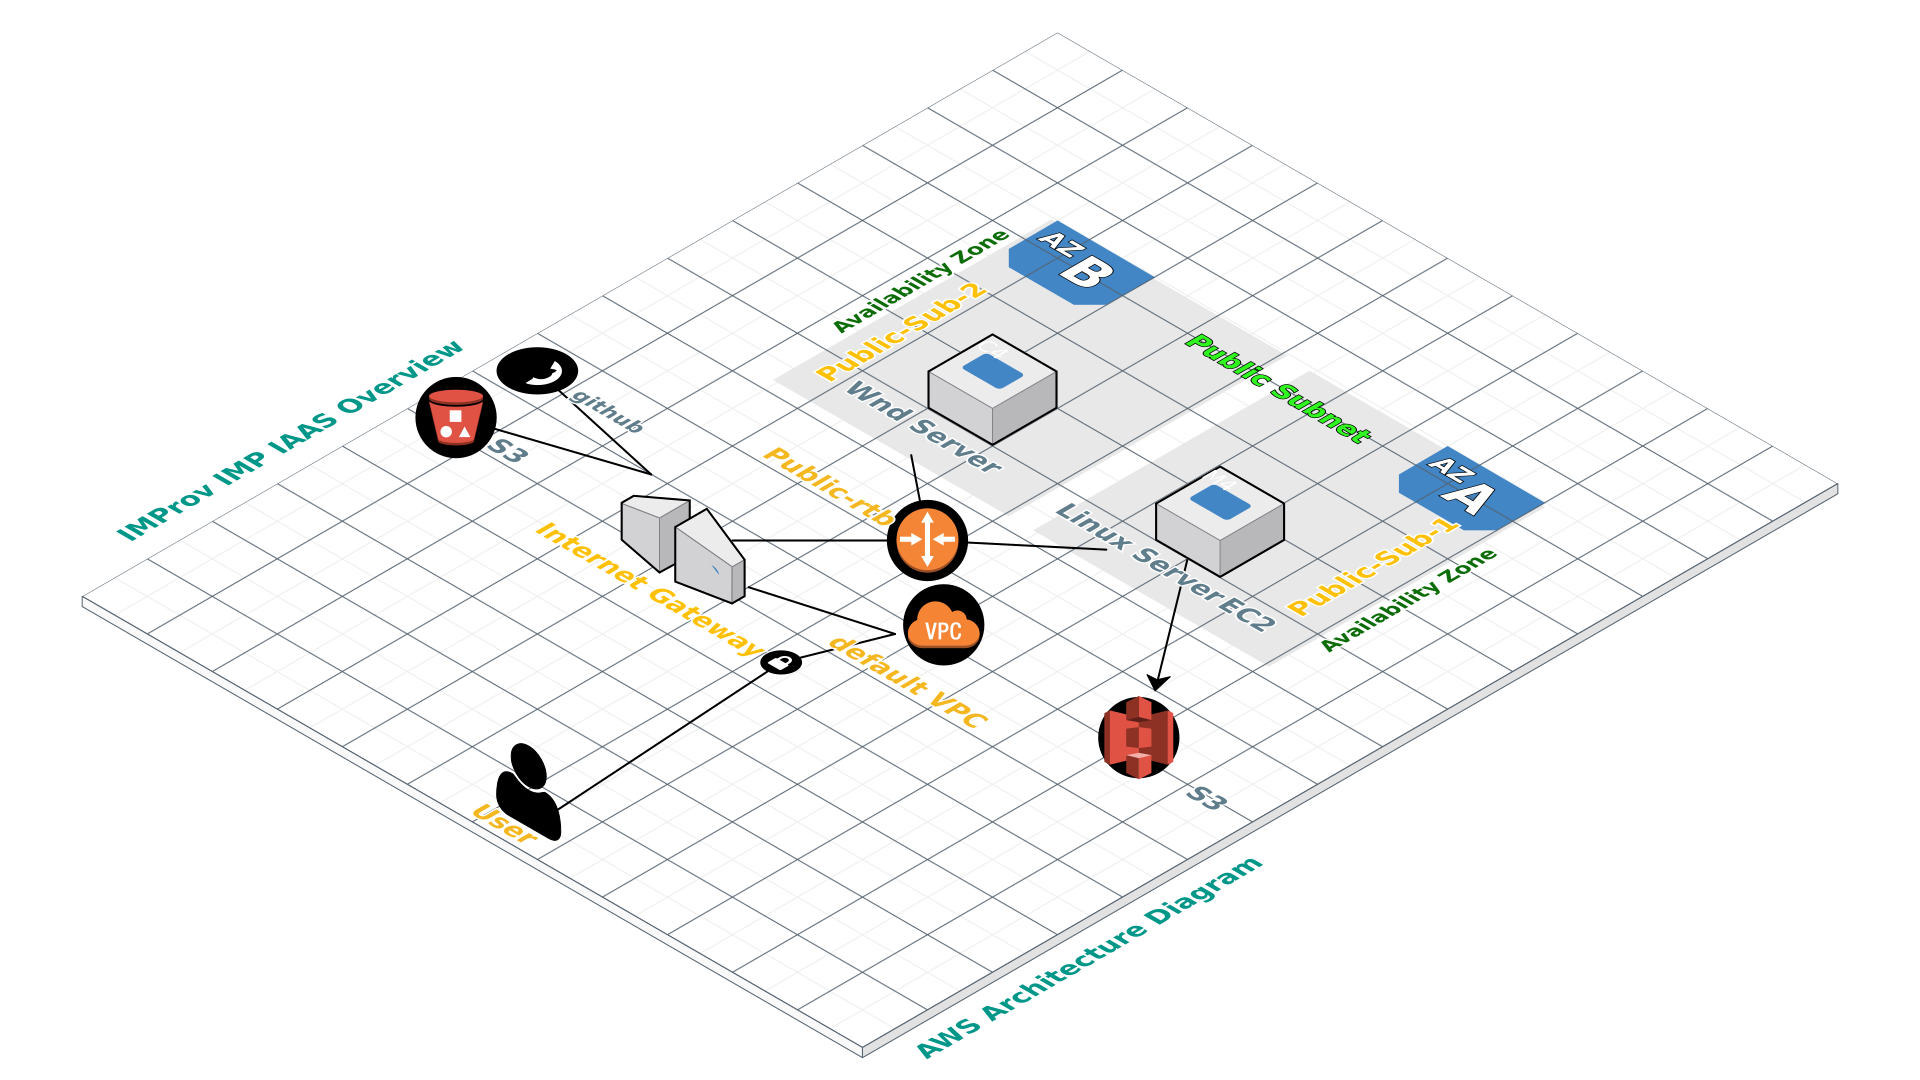
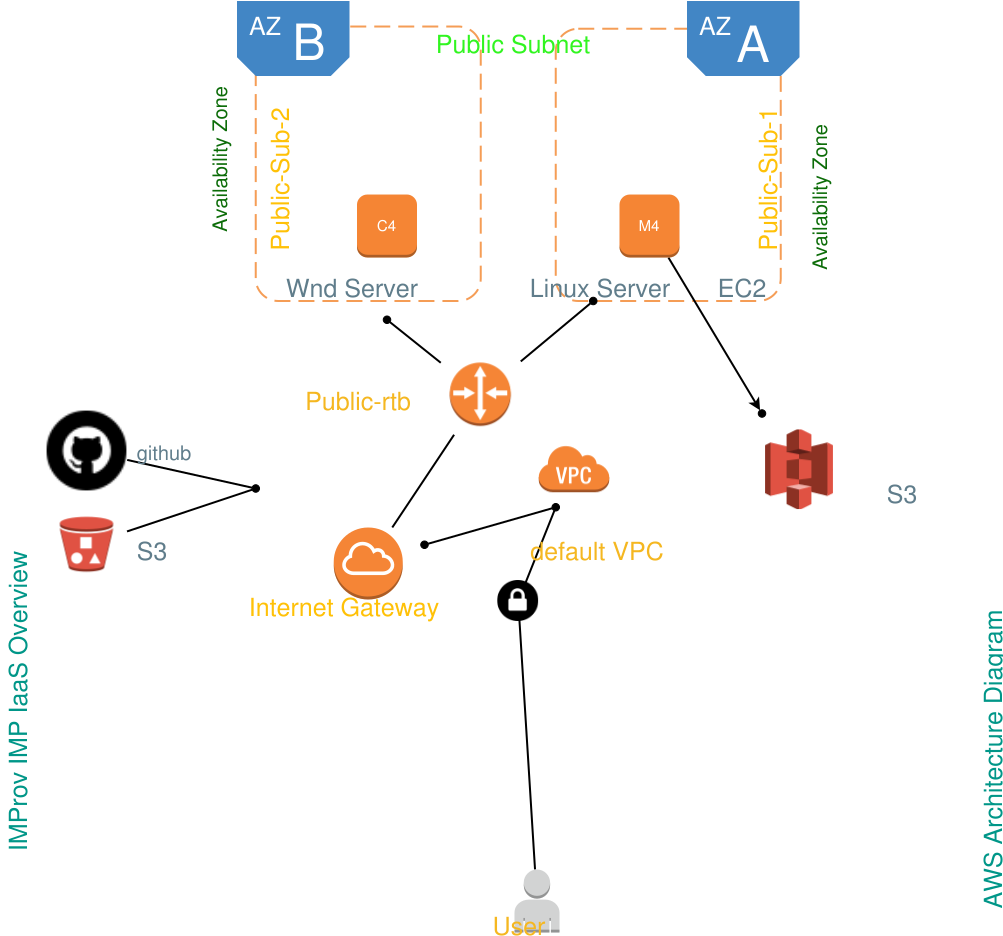
AWS environment 2D:
									# aws cli command with the aws cli already configured using aws configure

# launch spot instance and pre-configured AMI via aws CLI:

aws ec2 run-instances --cli-input-json file://C:/dev/aws/aws_parallelcluster/mpi_launch_instance_config_v3b.json


# lookup the public IP address of the launched instance for the EC2 Dashboard

# use putty or MobaXterm to connect via ssh [private key setup required ]


#pre-configured AMI already has the sample project folders

sudo su -

cd /shared/imp/imp_msstudio_init-master/mss_out/imp_model


# pull the driver script from github gist; we also have this in s3

curl -LOk https://gist.githubusercontent.com/pellst/d12ad92371757ec8c873aa11a7d8f1a2/raw/aws_run_onenode.sh


# alt. get the driver script from s3

aws s3 cp s3://pcluster-resource/aws_run_onenode.sh .


# setup to run 200 frames

(base) [root@ip-172-31-25-238 imp_model]# vi ConfigImp.yaml


# add execute permissions to driver script

(base) [root@ip-172-31-25-238 imp_model]# chmod 755 aws_run_onenode.sh


# setup run as run num22

(base) [root@ip-172-31-25-238 imp_model]# ./aws_run_onenode.sh 22


# change to the imp_model22 folder and monitor the trace.log. For 200 frames this should complete in under 10minutes.


# in order to perform a custom modeling run we need only change from the sample location here:

/shared/imp/imp_msstudio_init-master/mss_out/imp_model

# to the folder which contains another modeling run bundle.

# We can setup the ConfigImp.yaml to run 200 frames and test again with aws_run_onenode.sh
Content of aws_run_onenode.sh:
									#/usr/bin/bash -x

runnum=$1

# pip install awscli --upgrade --user


sudo mkdir /shared/imp/imp_msstudio_init-master/mss_out/imp_model$runnum

cd      /shared/imp/imp_msstudio_init-master/mss_out/imp_model$runnum

sudo cp /shared/imp/imp_msstudio_init-master/mss_out/imp_model/*.* /shared/imp/imp_msstudio_init-master/mss_out/imp_model$runnum

nohup /shared/anaconda/bin/python prep_hyperp_imp_v2ux.py --count=1 --name=DemoImpModel --config=ConfigImp.yaml >/shared/imp/imp_msstudio_init-master/mss_out/imp_model$runnum/trace.log 2>&1 &


# archive

# tar -cvzf imp_model18.tgz /shared/imp/imp_msstudio_init-master/mss_out/imp_model18

# aws s3 cp imp_model18.tgz s3://pcluster-resource
Getting Started
These instructions will get you a copy of the example project up and running for testing purposes.
AWS job run:
- This requires running EC2 instances that are not eligible for the AWS Free Tier. While pricing varies, the typical cost for a 32cpu machine is under USD1.00 per hour.
- Links to AWS account setup, default VPC launch of EC2 instance using either on-demand or spot instance.
- Cloudcraft diagram of VPC, subnet, EC2 instance ( 16, 32 cpu options) , pricing ( on-demand, spot )
- Cloudformation script
- Prep AMI based on parallel-cluster image ( give version num ) - snapshot for golden image
- Amendment of cloudcraft script ( json or yaml style ) add AMI golden image to use
- IAM role for s3 upload of modeling results
- Option to upload a project content to s3 to store the project bundle generated by msstudio.
In order to work with MPI ( message passing interface ) jobs such as this IMP example on AWS, we need to lay the groundwork. Use your existing AWS account or signed up for AWS. Read the EC2 Getting Started Guide. Familiarize yourself with how to start, access, and terminate different machine instances. We make use of on-demand instances for convenience in the preparation of the initial machine image as we explain the installation of the pre-requisite software ( on a t2.micro EC2 instance, in the AWS Free Tier). Running EC2 spot instances is important, thereafter, in order to minimize costs for the testing of the MPI jobs. AWS has a research cloud program which you may consider joining, here.
We make use of a number of shortcuts via scripted steps to facilitate the initial setup and accelerate the deployment processs. At a later point we expand our explanation and provide further information or links to help fill in the knowledge gaps.
Initial setup assistance provided by the prep_step* shell scripts ( aws ):
									# make use of this gist to get the prep_step* shell scripts located here

# /shared/imp/imp_msstudio_init-master/mss_out/imp_model

curl -LOk https://gist.githubusercontent.com/pellst/9f7ad519133dae87f8f813b506b45aac/raw/aws_mss_prep_step1.sh

chmod 755 aws_mss_prep_step1.sh

./aws_mss_prep_step1.sh


# prepare anaconda install

#/shared/imp/imp_msstudio_init-master/mss_out/imp_model/aws_mss_prep_step2.sh

#/shared/imp/imp_msstudio_init-master/mss_out/imp_model/aws_mss_prep_step3.sh
Prerequisites
The PRC2 sample project was prepared using the MassSpecStudio application. The IMP job driver script runs with python 3.x and has a dependency on the Python Modeling Interface (PMI).
The initial software installation of python with Anaconda and python packages for imp are included in the setup script. The individual steps are highlighted once again, hereafter.
#initial setup for PMI using anaconda
Anaconda3\Library\bin\conda config --add channels salilab
Anaconda3\Library\bin\conda install imp scikit-learn matplotlib
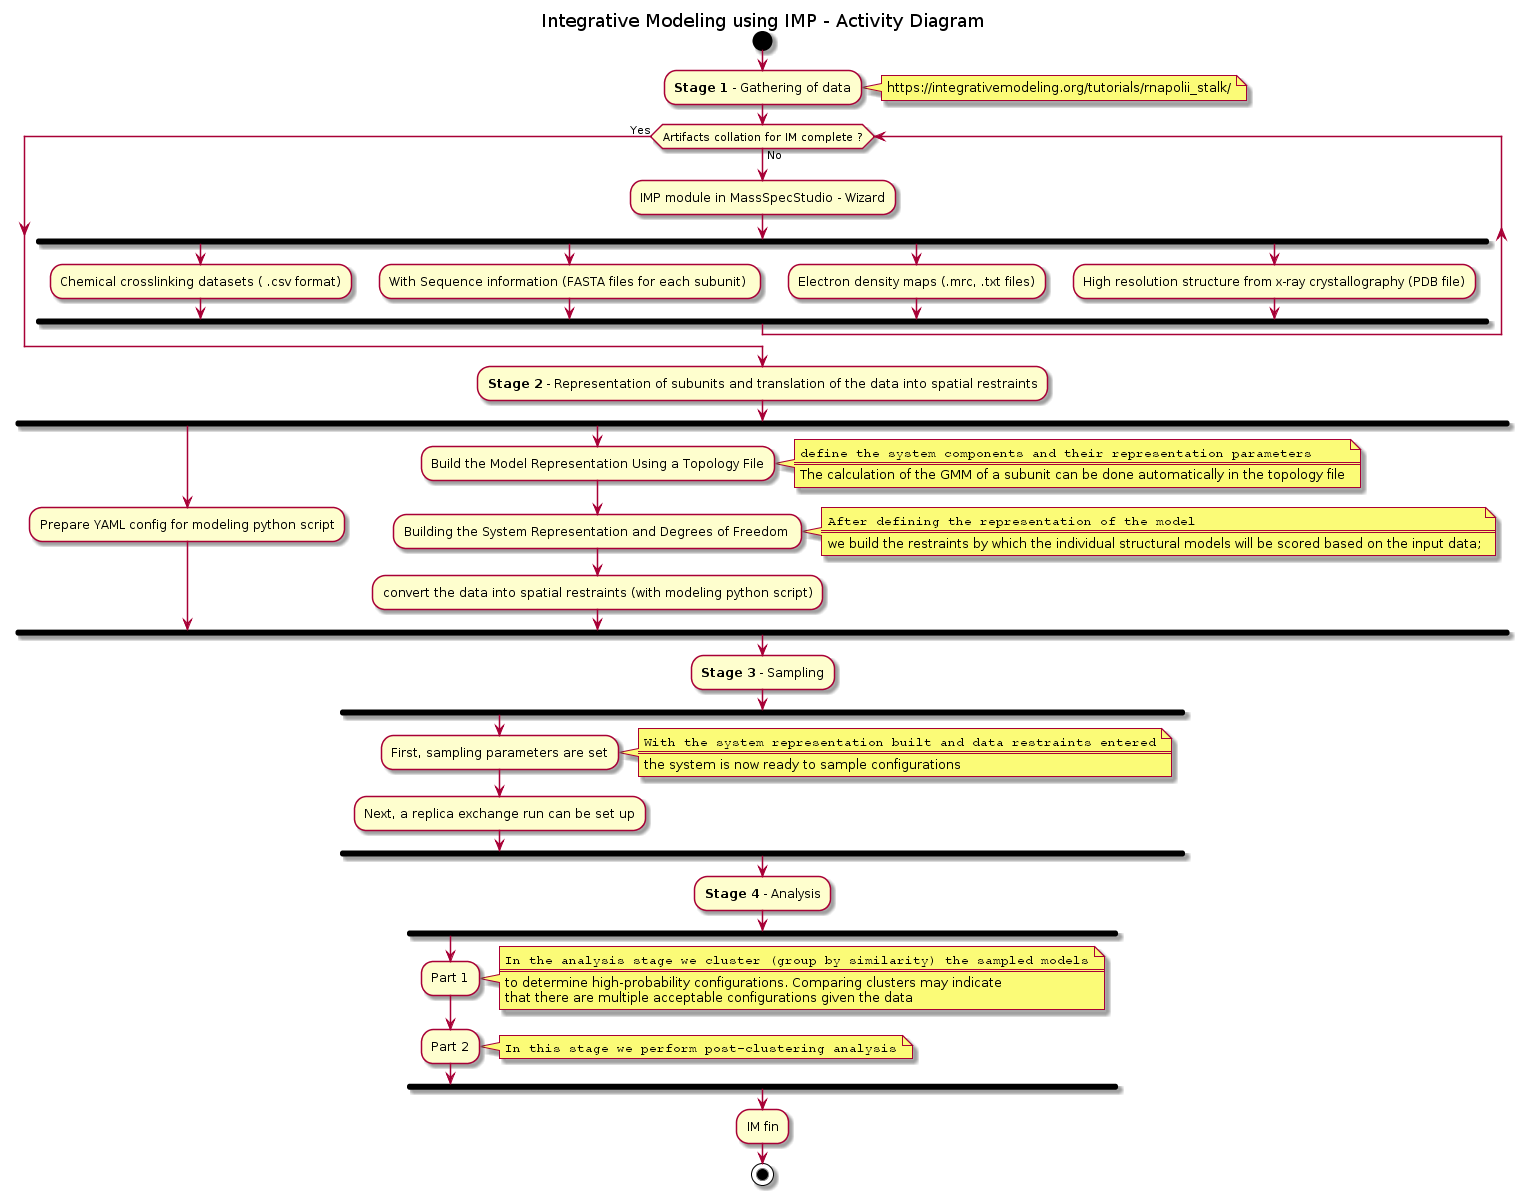
#https://integrativemodeling.org/tutorials/rnapolii_stalk/
Anaconda3\Library\bin\conda install numpy scipy
#bring up Anaconda Prompt and run : activate base
#you can see envs available with: conda info --envs
#for example: this shows us that base is c:\apps\Anaconda3
Performance Expectations: On a 16cpu instance we have observed up to 50 frames per minute throughput, although 30 frames per minute is typical. We expect 20000 frames to complete in 10 hours ( based on PRC2 example ).
The base ami was setup using an aws parallel-cluster image ( linux ), namely:
									alinux:

us-west-2: ami-09b457d5cba24514a
The EC2 instance used to prepare the base ami does not need to be xlarge. We can accomplish the software installation on t2.micro, although selecting a t3a.large instance that has higher network speeds does help.
The EC2 instance used to perform a job run needs to be xlarge. For example:
c4.4xlarge
The EBS storage sizing considerations
30Gb
Installing
The readme_setup_aws.txt is a good place to start. This explains how to setup the example project on AWS. If you are using an AMI that already has the Anaconda and IMP installed then you do not need to repeat the installation aws_mms_prep* steps. You can go directly to your modeling scripts folder and setup a job run ( using aws_run_onenode.sh ).
Taken from the readme_setup_aws.txt:
									#### get the setup script from github gist and review it

~~~

curl -LOk https://gist.githubusercontent.com/pellst/4853822ea5ca74785af61d0ad39cf84d/raw/uoc_mss_prep_step1.sh

chmod 755 uoc_mss_prep_step1.sh

~~~


#### run the script aws_mss_prep_step1.sh in order to get the sample folders setup

~~~

./aws_mss_prep_step1.sh

~~~


#### in the folder /shared/imp/imp_msstudio_init-master/mss_out/imp_model, the following shell scripts are now available

~~~

   aws_mss_prep_step1.sh

   aws_mss_prep_step2.sh

   aws_mss_prep_step3.sh

~~~


#### we can continue on to step2 to setup anaconda

./aws_mss_prep_step2.sh

conda --version

python --version


#### once anaconda has been setup we can bring in the imp module and others needed for the job run

./aws_mss_prep_step3.sh


#### the next step is to review the following:

#### located in /scratch/username/imp/imp_msstudio_init-master/mss_out/imp_model

ConfigImp.yaml

aws_run_onenode.sh
Amend the sampling_frame in ConfigImp.yaml:
sampling_frame: 100
- The cores is used for the ntasks-per-node=x where x=16 is a good starting point.
- Performance expectations are that with a single node and 1 cpu per task and 16 tasks per node we can run 20000 sampling_frame in 9 hours.
#in order to run the job we call this and give a unit number to be used for naming the folder that is setup eg: 12 here
									chmod 755 aws_run_onenode.sh

./aws_run_onenode.sh 12
#once the job has finished, look in the imp_model_12 folder and inspect the logs
tail -100 prep_hyperp_imp_v2ux.log
#a successful run will include the output folders from the job. Copy the entire imp_model_12 to local machine ( optionally tar the folder in order to archive)
#in order to run multiple jobs in parallel. From the imp_model folder amend the configuration as needed and call mjob_run_cedar.sh nn once again.
The wrapper script aws_run_onenode.sh essentially performs a call to launch: python prep_hyperp_imp_v2ux.py and this in turn runs the prep_hyperp_imp_v2ux.py driver script. The configuration of the driver script is accomplished with the ConfigImp.yaml There are assumptions that have been made and while a basic modeling run has been anticipated. The prep_hyperp_imp_v2ux.py script can be customised further in order to fit the specific modeling scenario.
finished
Deployment
The json file needed to configure the cli-input-json typically has the following elements: (NetworkInterfaces section is optional and may be required when not launching into default VPC).
									{

    	"ImageId": "ami-nnnn your custom ami with anaconda and IMP already installed",

    	"InstanceType": "m5.2xlarge",

    	"KeyName": "your_security_key",

    	"SecurityGroupIds": [

        		"sg-nnnn your security group"

    	],

    	"SubnetId": "subnet-nnnn your default subnet in US-West2a for example",

    	"DisableApiTermination": false,

    	"DryRun": false,

    	"EbsOptimized": true,

    	"IamInstanceProfile": {

        		"Name": "s3_imp_rw_only your IAM role with RW access to s3 bucket"

    	 },

    	"NetworkInterfaces": [

        		{

            			"AssociatePublicIpAddress": true,

            			"DeleteOnTermination": true,

            			"DeviceIndex": 0

        		}

    	],

    	"InstanceMarketOptions": {

        		"MarketType": "spot",

        		"SpotOptions": {

            			"MaxPrice": "0.70",

            			"SpotInstanceType": "one-time",

            			"BlockDurationMinutes": 120,

            			"InstanceInterruptionBehavior": "terminate"

        		}

    	}

	}
AWS golden image
How to prepare a golden image with the required software together with the PRC2 sample project.
Once we have the aws EC2 instance up and running. We can login via ssh to the new instance and perform the software setup steps:
									# in a single vm we can create /shared folder

# sudo mkdir /shared

# sudo chmod 777 /shared


# make use of this gist to get the prep_step* shell scripts located here

# /shared/imp/imp_msstudio_init-master/mss_out/imp_model

curl -LOk https://gist.githubusercontent.com/pellst/9f7ad519133dae87f8f813b506b45aac/raw/aws_mss_prep_step1.sh

chmod 755 aws_mss_prep_step1.sh

./aws_mss_prep_step1.sh


# prepare anaconda install

#/shared/imp/imp_msstudio_init-master/mss_out/imp_model/aws_mss_prep_step2.sh


# prepare python package install

#/shared/imp/imp_msstudio_init-master/mss_out/imp_model/aws_mss_prep_step3.sh
Upon completion of the software install. We take a snapshot of the aws AMI so that we can use this configured ami to launch new EC2 instances with suitable CPU and memory capacity for the MPI job run for the IMProv PRC2 sample project or your own IMP project.
From here you can follow the FastTrack section and use the newly minted ami to run the PRC2 sample project as an IMP MPI job on aws.
AWS environment 3D: